I've done some pretty good things in my life. I've cared for thousands of sick people. I've entertained all kinds of people with words and music. I like to think I've been a good husband, a good son, a good friend, and a good citizen.
But if I died tomorrow, I imagine people would say one thing: "He sure made some tasty bacon."
It was only about a year ago that I dove headlong into charcuterie, using Michael Ruhlman and Brian Polcyn's excellent book as my guide. I haven't ventured in as far as I'd like, limited somewhat by materials (and even more by laziness), but I've been floored by how good even first attempts have come out.
As it turns out, the hardest part of making bacon is tracking down fresh pork belly. But sometimes all you have to do is ask:

This came from Food City right here in Haz Vegas. I happened to ask the meat guys one morning while I was shopping, and they had just gotten a box of pork bellies in. They usually sell it sliced, but you want it whole, or at most cut in half.
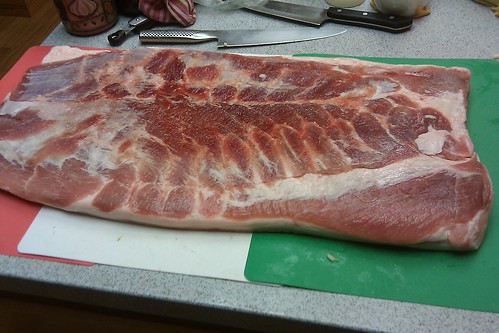
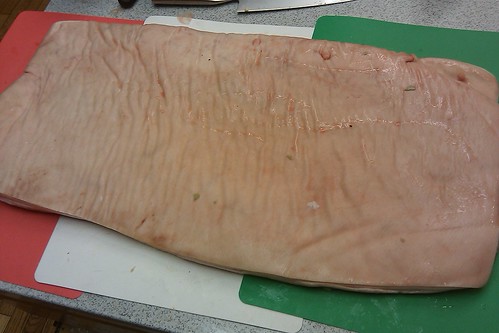
The pork belly is beautiful meat on one side and pig skin on the other, with that nice big seam of fat in between. You can take that skin off at this point, and you have to if you're going to do a rolled-up preparation like pancetta. But for this purpose, you should leave it on--it's much easier to take off after it's done, and a big hunk of cured and smoked pig skin is the best friend a pot of beans ever had.
You should trim the belly into a nice rectangle. You can toss the trimmings with some basic dry cure (see below) to make salt pork, or save them to add to some sausage later on. But this belly came nice and trimmed already, so all I had to do was split it in half and throw each chunk in a Big Ass Ziploc.

(Can I say how much I love the Big Ass Ziploc? They come in two and 2 1/2-gallon sizes, and they're awesome for all kinds of things. They're especially useful when you're traveling; for instance, you can put your laptop in one inside your laptop bag to keep it dry in a downpour.)
So next we need our cure. You can add just about any flavor you want, but unsurprisingly, my favorite is garlic and lots of it.
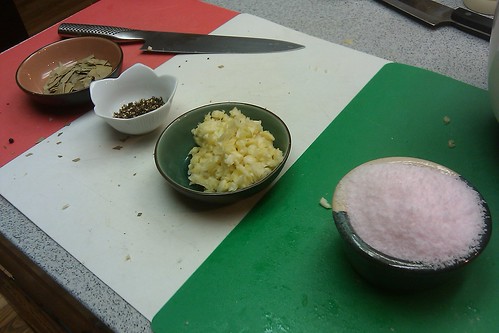
Left to right, we have about nine bay leaves, a tablespoon or so of really coarse cracked pepper (use your grinder wide open, or a heavy skillet and all your aggression), about 18 cloves of garlic smashed up, and about a cup of Basic Dry Cure, which is 8 parts (by weight) kosher salt, 4 parts sugar, and 2 parts "pink salt".
Pink salt is sodium nitrite, often sold as Insta-Cure #1. It helps preserve the bacon in several ways--it keeps it from going rancid, it preserves its red color with cooking, and it inhibits bacterial growth, especially our friend C. botulinum. It isn't naturally pink; it's colored that way so you won't mistake it for regular salt. It's available all over the internet, and a few bucks will buy you more than you'll ever use.
From here the process gets complicated: you mix all this stuff up and rub it all over the pork belly.

Don't worry about covering every square inch; as juice drains from the belly it will dissolve the salt and spread the flavors all over the meat. Just spread it kind of evenly on both sides.
Finally, seal up the bags and stash them in the fridge as flat as possible.

These will live in their bags in the fridge for 7-10 days, or until they're pretty firm in the middle. Every other day you'll want to flip the bags over and redistribute the cure all over the meat. (I like to put a schedule up on the fridge for doing this, so I don't forget.) And that's when we'll move on to Part II--when the meat hits the smoke.

But if I died tomorrow, I imagine people would say one thing: "He sure made some tasty bacon."
It was only about a year ago that I dove headlong into charcuterie, using Michael Ruhlman and Brian Polcyn's excellent book as my guide. I haven't ventured in as far as I'd like, limited somewhat by materials (and even more by laziness), but I've been floored by how good even first attempts have come out.
As it turns out, the hardest part of making bacon is tracking down fresh pork belly. But sometimes all you have to do is ask:
This came from Food City right here in Haz Vegas. I happened to ask the meat guys one morning while I was shopping, and they had just gotten a box of pork bellies in. They usually sell it sliced, but you want it whole, or at most cut in half.
The pork belly is beautiful meat on one side and pig skin on the other, with that nice big seam of fat in between. You can take that skin off at this point, and you have to if you're going to do a rolled-up preparation like pancetta. But for this purpose, you should leave it on--it's much easier to take off after it's done, and a big hunk of cured and smoked pig skin is the best friend a pot of beans ever had.
You should trim the belly into a nice rectangle. You can toss the trimmings with some basic dry cure (see below) to make salt pork, or save them to add to some sausage later on. But this belly came nice and trimmed already, so all I had to do was split it in half and throw each chunk in a Big Ass Ziploc.
(Can I say how much I love the Big Ass Ziploc? They come in two and 2 1/2-gallon sizes, and they're awesome for all kinds of things. They're especially useful when you're traveling; for instance, you can put your laptop in one inside your laptop bag to keep it dry in a downpour.)
So next we need our cure. You can add just about any flavor you want, but unsurprisingly, my favorite is garlic and lots of it.
Left to right, we have about nine bay leaves, a tablespoon or so of really coarse cracked pepper (use your grinder wide open, or a heavy skillet and all your aggression), about 18 cloves of garlic smashed up, and about a cup of Basic Dry Cure, which is 8 parts (by weight) kosher salt, 4 parts sugar, and 2 parts "pink salt".
Pink salt is sodium nitrite, often sold as Insta-Cure #1. It helps preserve the bacon in several ways--it keeps it from going rancid, it preserves its red color with cooking, and it inhibits bacterial growth, especially our friend C. botulinum. It isn't naturally pink; it's colored that way so you won't mistake it for regular salt. It's available all over the internet, and a few bucks will buy you more than you'll ever use.
From here the process gets complicated: you mix all this stuff up and rub it all over the pork belly.
Don't worry about covering every square inch; as juice drains from the belly it will dissolve the salt and spread the flavors all over the meat. Just spread it kind of evenly on both sides.
Finally, seal up the bags and stash them in the fridge as flat as possible.
These will live in their bags in the fridge for 7-10 days, or until they're pretty firm in the middle. Every other day you'll want to flip the bags over and redistribute the cure all over the meat. (I like to put a schedule up on the fridge for doing this, so I don't forget.) And that's when we'll move on to Part II--when the meat hits the smoke.

I will do anything for your homemade garlic bacon...
ReplyDelete